
Imagine the weight of a bone-dry porcelain vessel in your palm; it is light, chalky, and incredibly thirsty. This is the moment where physics meets art. When you prepare for Fluid Pottery Glazing, you are not just painting a surface; you are managing a high-speed hydraulic event. The bisque-fired clay acts like a rigid sponge with high capillary suction, ready to pull the water out of your glaze suspension in a matter of seconds. If you hesitate, you get drips. If you rush, you get bald spots. We are aiming for that perfect, buttery-smooth coat that looks like it was grown rather than applied. You have to feel the viscosity of the liquid against the resistance of the air. It is a dance of surface tension and gravity. Grab your apron and tie your hair back because we are about to dive deep into the chemistry of the dip. We want a finish so uniform it looks like liquid glass frozen in time.
THE STUDIO KIT
To master the art of the dip, your workbench needs more than just a bucket of color. You need a **hydrometer** to measure the specific gravity of your glaze; this ensures your water-to-solid ratio is consistent every single time. You will also need stainless steel dipping tongs with minimal contact points to reduce scarring on the clay body. For precision, keep a set of **calipers** nearby to check the rim thickness, as glaze builds up more heavily on sharp edges. A high-speed **blunger** or a drill with a mixing attachment is essential to keep the metal oxides from settling at the bottom of the vat.
Material Substitutions: If you do not have professional dipping tongs, you can use a "three-finger" grip with latex gloves, though this requires more manual dexterity to avoid leaving "witness marks." Instead of a commercial deflocculant, a tiny drop of sodium silicate can help adjust the flow of a stubborn, thick glaze. For a DIY stirring tool, a sturdy wooden dowel works, but it lacks the shear force of a mechanical mixer to properly break up clumps of frit and cobalt.
THE TEMPO
The "Maker's Rhythm" is a three-act play. Act one is the Homogenization Phase, which takes about ten minutes of vigorous mixing to ensure the suspension is stable. Act two is the Immersion Window, the actual dipping motion that lasts only three to five seconds per piece. Act three is the Evaporation Interval, where the piece must remain perfectly still for sixty seconds while the porous clay pulls the moisture in, "setting" the glaze. Total active time per piece is less than two minutes, but the mental focus required is intense. You are working against the clock of absorption.
THE CORE METHOD
1. The Vertical Plunge
Hold your piece firmly with the tongs at a ninety-degree angle to the glaze surface. Submerge the vessel in one swift, continuous motion. This prevents "tide lines" where the glaze might double up. Mastery Tip: This relies on hydrostatic pressure. As the piece enters the liquid, the pressure forces the glaze into every microscopic pore of the bisque, ensuring a mechanical bond that survives the heat of the kiln.
2. The Angular Entry
Instead of going straight down, tilt the piece at a forty-five-degree angle as it breaks the surface. This allows air trapped inside the foot ring or the interior to escape gracefully. Mastery Tip: This technique manages displacement. By allowing air to vent, you prevent "air pockets" that leave raw, unglazed patches on the interior of your bowls or mugs.
3. The Controlled Swirl
Once submerged, give the piece a gentle, rhythmic rotation. This ensures that the particles of silica and alumina are distributed evenly across curved surfaces. Mastery Tip: The physics here involves centripetal force. The slight rotation helps the glaze move over the "shoulders" of a vase, preventing the liquid from thinning out on the widest parts of the form.
4. The Snap-Back Exit
Pull the piece out of the vat with a quick, vertical snap. This uses inertia to shed the excess glaze back into the bucket before it can form heavy runs. Mastery Tip: This utilizes kinetic energy to overcome the surface tension of the liquid, resulting in a thinner, more professional coat that won't "crawl" during the firing.
5. The Pendulum Swing
Immediately after the exit, swing the piece gently back and forth like a clock pendulum. This encourages the wet glaze to level out across the surface before it sets. Mastery Tip: This is all about rheology. By keeping the glaze in motion for an extra two seconds, you allow the "thixotropic" properties of the liquid to smooth out any minor ridges left by the tongs.
6. The Rim Tap
Give the tongs a sharp tap against the side of the vat while the piece is upside down. This dislodges the final stubborn droplet from the rim. Mastery Tip: This addresses capillary fringe. Glaze loves to accumulate on edges; the vibration of the tap breaks the surface tension of that last drop, preventing a thick "bead" from forming on the lip.
7. The Inverted Drain
Hold the piece upside down for a full ten count. This allows gravity to pull the glaze toward the rim rather than the foot, which is safer for your kiln shelves. Mastery Tip: This manages the glaze thickness gradient. Since glaze naturally flows downward in the kiln, starting with a slightly thinner coat at the bottom prevents "running" and "sticking" accidents.
8. The Foot Wipe
Once the glaze is dull and no longer tacky, use a damp, high-density sponge to remove all glaze from the bottom quarter-inch of the piece. Mastery Tip: This creates a thermal expansion buffer. Clay and glaze expand at different rates; leaving the foot bare prevents the glaze from "plucking" bits of the kiln shelf off during the cooling cycle.
9. The Aerated Set
Place the piece on a wire rack rather than a flat board. This allows air to circulate around the entire form, ensuring the glaze dries at a uniform rate. Mastery Tip: This prevents differential drying. If one side dries faster than the other, the glaze can crack or "flake" off the bisque before it even reaches the kiln.
THE TECHNICAL LEDGER
To maintain your glaze's longevity, always store it in an airtight five-gallon bucket. If left open, the water evaporates, changing the solids content and ruining your carefully calculated dip time. Use a stainless steel sieve (80-mesh) to strain your glaze once a month to remove any bits of bisque or dust that have fallen in.
Material Variations:
- Sustainable: Use wood ash as a natural flux in your glaze recipes to reduce reliance on mined chemicals.
- Recycled: Reclaim "overspray" from your glazing booth and re-sieve it for a unique "house blend" base coat.
- Premium: Incorporate rare earth oxides like neodymium for "color-shift" effects that change under different lighting.
The Correction:
- Pinholes: If you see tiny holes, your bisque was dusty. Fix: Rub the dry glaze gently with a finger to "fill" the hole before firing.
- Crazing: Tiny cracks after firing mean the glaze is too small for the clay. Fix: Add more silica to your glaze mix to adjust the coefficient of thermal expansion.
- Crawling: Glaze beads up like water on a greasy car. Fix: Ensure your bisque is free of hand oils; wash your hands before handling "greenware."
Studio Organization: Store your glazed pieces in a "dust-free" cabinet. Even a tiny amount of household dust can cause the glaze to repel from the clay during the melt, leading to unsightly bald spots.
THE FINAL REVEAL
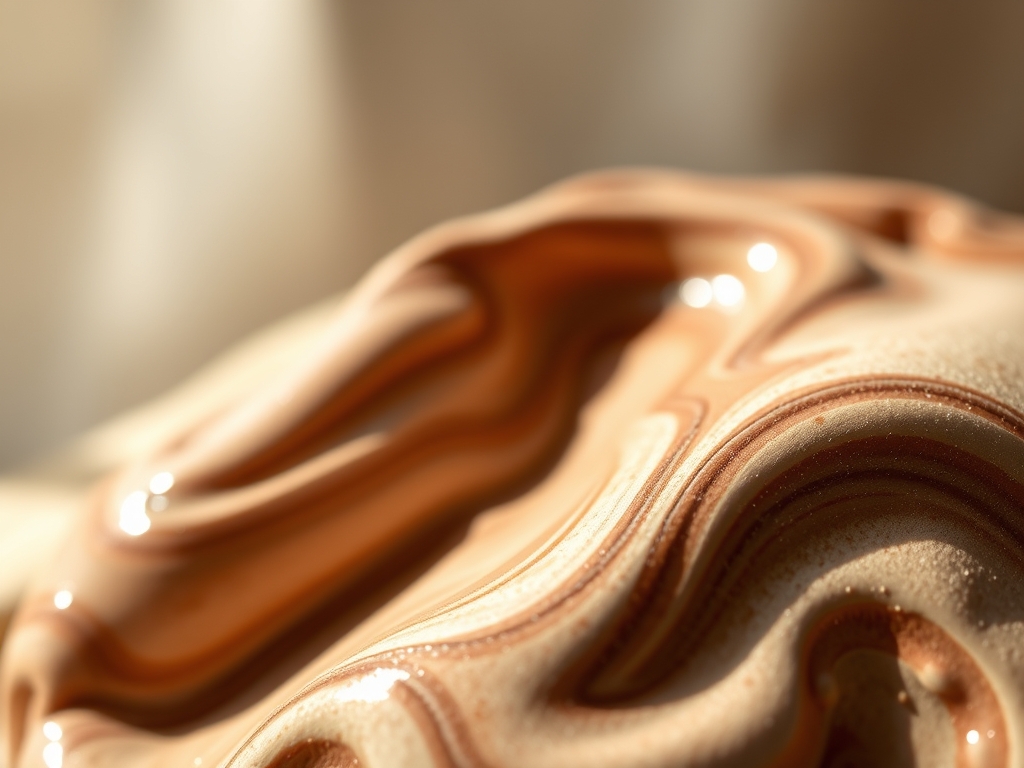
When you pull that piece out of the kiln, the transformation is staggering. What was once a dull, powdery coating has become a vibrant, vitrified skin. If you followed the rhythm, the surface will be as smooth as a polished gemstone, with no drips or thin spots to distract the eye. You have successfully navigated the complex physics of Fluid Pottery Glazing. The weight feels balanced, the rim is crisp, and the color is deep and resonant. It is a testament to your precision and your respect for the materials.
STUDIO QUESTIONS
How do I know if my glaze is the right thickness?
Use a hydrometer to check the specific gravity. For most dipping glazes, a reading between 1.40 and 1.50 is ideal. Alternatively, a "finger dip" should coat your skin evenly without showing your fingernail through the liquid.
Why does my glaze keep peeling off before firing?
This is usually caused by "over-dipping" or a glaze with too much clay content. If the layer is too thick, the tensile stress during drying causes it to lose its bond with the bisque. Aim for a thinner application.
Can I dip a piece twice for a layered effect?
Yes, but wait for the first layer to be completely bone-dry. The second dip must be very fast (one second) to prevent the moisture from re-hydrating the first layer and causing the whole surface to slide off.
What is the best way to mix a large vat of glaze?
Use a mechanical mixer or a drill with a paint-stirring attachment. Move the paddle in a "figure-eight" motion to ensure the heavy minerals at the bottom are fully suspended in the liquid for a consistent finish.

