
Grab your favorite mug and clear the workbench because we are about to dive into the visceral, high energy world of fiber physics. There is a specific magic that happens when you first touch a high quality wool warp; it is not just soft; it possesses a specific tensile strength that feels like a coiled spring ready to release. Mastering the art of Rhythmic Loom Warping is about more than just threading strings through a piece of wood. It is about synchronizing your heartbeat with the mechanical resistance of the loom. You can feel the friction coefficients change as the yarn slides through the reed. When you get the tempo right, the loom stops being a tool and starts being an extension of your own skeletal structure. We are chasing that perfect, melodic "ping" of a perfectly tensioned line. If the tension is off by even a few grams of pressure, the structural integrity of your textile will fail during the beat. We are here to ensure every single thread behaves with absolute mathematical precision while we keep the vibes immaculate.
THE STUDIO KIT

Before we throw a single loop, we need to audit your inventory. You cannot achieve professional results with subpar hardware. First, you need a high quality rigid heddle or floor loom with smooth, sanded surfaces to prevent fiber snagging. Your primary material should be a multi-ply mercerized cotton or a high-twist wool; these fibers offer the best elastic recovery under stress. You will also need a threading hook with an ergonomic grip to prevent repetitive strain during the long setup phase. Grab your digital calipers to measure the exact thickness of your warp ends; consistency is the enemy of "the sag."
For the hardware junkies, a set of heavy duty warping pegs is non-negotiable for maintaining a consistent path length. If you are looking for Material Substitutions, you can swap traditional cotton for recycled hemp or linen, but be warned: linen has almost zero elongation properties. This means your Rhythmic Loom Warping must be even more precise because the fiber won't forgive a heavy hand. Always keep a bone folder nearby to crisp up your paper separators as you wind the back beam; this prevents the layers from "diving" into each other and ruining your tension.
THE TEMPO
Time is a material just like yarn. In our studio, we break the process down into specific "beats" to maintain the Maker's Rhythm. The initial warping board setup usually takes about 45 minutes of focused, repetitive motion. Threading the reed and the heddles is the "deep work" phase, requiring 60 to 90 minutes of quiet concentration. Finally, the "beaming on" process takes 30 minutes of physical, athletic movement.
The Maker's Rhythm is the psychological state where your hands move faster than your internal critic can talk. By timing these phases, you prevent the fatigue-induced errors that usually happen around hour two. Professional weavers know that if you rush the warping, you spend ten times that saved time fixing tension gaps later. Respect the clock, and the clock will respect your fabric.
THE CORE METHOD
1. Calculating the Warp Path
Before the first knot, we calculate the total length including loom waste and take up. We use a math-heavy approach to ensure the linear density of the yarn matches the "dents per inch" (DPI) of our reed.
Mastery Tip: Use the science of surface area. If your yarn is too thick for the dent, the friction will abrade the fiber scales, leading to "pilling" before the cloth is even finished.
2. Measuring on the Warping Board
Hold the yarn with a consistent "C-grip" to maintain a steady pull-force. Every circuit around the pegs must be identical in length to avoid "long threads" that cause loops in your weaving.
Mastery Tip: This is about Hooke's Law. Stress is proportional to strain. If you pull one loop tighter than the next, you are storing unequal potential energy in the loom.
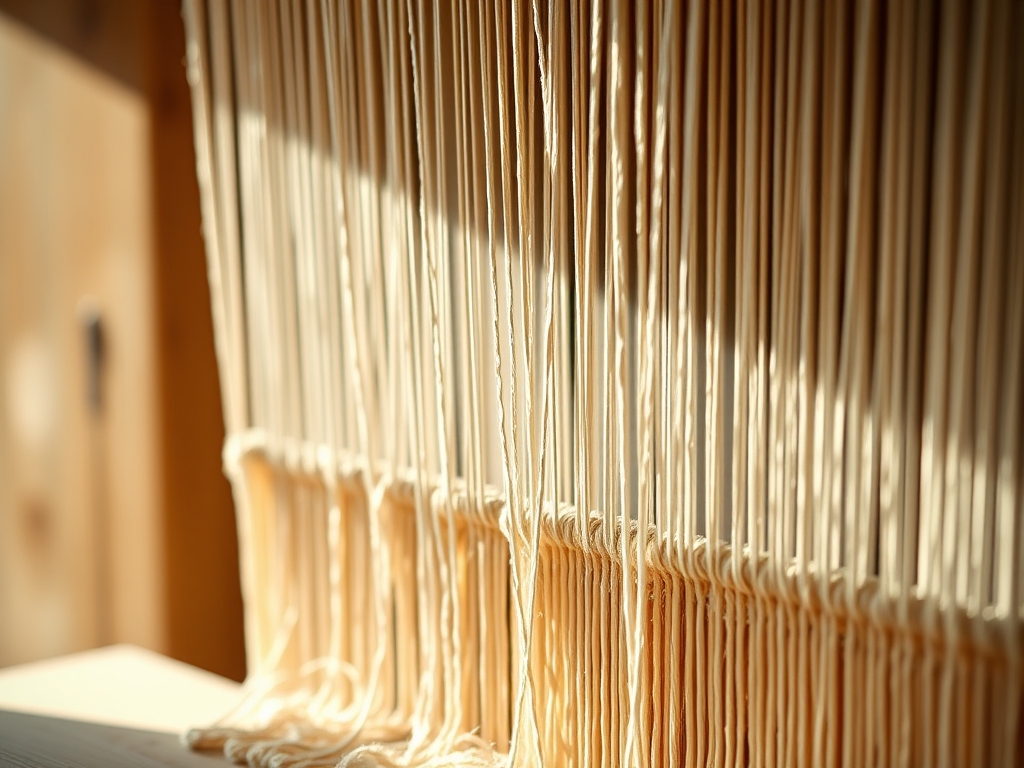
3. Creating the Cross
The "Cross" is the brain of your warp. It keeps every thread in a strict 1-2-1-2 sequence. We secure this with a lease string made of a contrasting color for high visual feedback.
Mastery Tip: The cross prevents tangential entanglement. By isolating each thread, you reduce the static electricity generated by fibers rubbing together.
4. Sleying the Reed
Using your threading hook, pull each loop through the metal or plastic gaps in the reed. This determines the final width and drape of your project.
Mastery Tip: Use a balanced weave geometry. If you skip a dent, you create a structural weakness that will cause the fabric to bias or "smile" once it is removed from the loom.
5. Threading the Heddles
This is where the magic happens. Each thread goes through a specific eyelet to allow for the "shed" to open. Accuracy here is binary; it is either perfect or it is a mistake.
Mastery Tip: This involves mechanical advantage. The height of your heddles determines the "shed angle," which affects how much stress is placed on the yarn's breaking point during the beat.
6. Beaming On with Tension
Wind the warp onto the back beam while a partner holds the yarn or by using the "crank and yank" method. You must insert heavy-gauge paper or sticks between every rotation.
Mastery Tip: This prevents warp-beam compression. Without separators, the top layers of yarn will bury themselves into the bottom layers, creating uneven tension across the width.
7. Tying the Front Apron
Bring the yarn groups to the front and tie them to the apron bar using a surgeon's knot for maximum security and minimal bulk.
Mastery Tip: Aim for uniformity of torque. Use your palm to "vibrate" the threads; they should all resonate at the same frequency, indicating identical tension levels.
8. The Tension Audit
Check every inch of the warp for "slackers." Use a small weight or a "S-hook" to add tension to any individual threads that feel soft compared to the rest of the pack.
Mastery Tip: This addresses creep and relaxation. Fibers naturally "relax" after being pulled; a 10-minute wait before your final check allows the molecular bonds to stabilize.
THE TECHNICAL LEDGER
Maintenance & Longevity: To keep your loom in peak condition, burnish the wooden surfaces with a high quality beeswax once a year. This reduces the coefficient of friction and protects the wood from humidity-induced warping.
Material Variations:
- Sustainable: Use Tencel or Bamboo for a high-sheen, low-impact project.
- Premium: Silk-wool blends offer the highest tensile strength to weight ratio.
- Recycled: Chiffon strips can be used, but require a lower warp density to accommodate their bulk.
The Correction:
- The Crossed Thread: If two threads cross behind the heddle, they will snap. Fix this by re-threading immediately; do not try to "weave through it."
- The Loose Selvedge: If your edges are sagging, you likely didn't "flick" the yarn correctly at the turn. Use a temple to maintain consistent width.
- The Heddle Skip: A missing thread creates a hole. Use a "repair thread" weighted with a film canister off the back of the loom to fill the gap.
Studio Organization: Store your warped loom away from direct sunlight. UV rays degrade the polymer chains in natural fibers, making them brittle. Use a dust cover to prevent particulates from settling into the "hook and eye" of the heddles.
THE FINAL REVEAL
Look at that! When you finish a session of Rhythmic Loom Warping, the loom looks like a high-tech instrument. The threads are perfectly parallel; the tension is so tight you could play a tune on it. There is an incredible sense of power in knowing that you have organized thousands of yards of fiber into a perfect, mathematical grid. Your finished textile will have a professional hand and a structural integrity that "hobbyist" work simply lacks. You didn't just make a scarf; you engineered a piece of tactile art.
STUDIO QUESTIONS
How do I know if my tension is tight enough?
Press your palm against the warp. It should feel like a firm trampoline with no "dead zones." If a thread sags when touched, it needs more tensile load to ensure a clean shed during the weaving process.
What is the best yarn for a beginner?
Start with a 3-ply mercerized cotton. The "mercerization" process increases the fiber's luster and strength while reducing its "stretchiness." This makes it much easier to maintain a consistent rhythmic loom warping tension throughout the entire setup.
Can I warp a loom by myself?
Absolutely. Use the "front-to-back" method and utilize tensioning weights or heavy water bottles tied to the warp bundles. This mimics the steady pull of a second person, ensuring your beaming process remains structurally sound and even.
Why are my edges pulling in?
This is called "draw-in." It happens when the weft tension is too high, pulling the warp threads toward the center. To fix this, ensure you are leaving a "weft arch" or "angle" before beating the yarn into place.
How often should I clean my reed?
Inspect your reed after every project using a magnifying glass. Use a soft brush or compressed air to remove "fiber lint." If dust builds up, it increases abrasive friction, which can snap delicate warp threads mid-weave.

