

Imagine the sensation of cold, brushed aluminum sliding against the soft, organic scales of a merino wool fiber. It is a friction game where the surface tension of the needle meets the elastic recovery of the yarn. When you pick up a pair of size 9 circular needles, you are not just making a hat; you are initiating a Rhythmic Knitting Motion that balances kinetic energy with structural integrity. This specific gauge is the sweet spot of the knitting world. It provides enough surface area for your hands to maintain an ergonomic grip while allowing the stitches to flow with a mechanical grace that smaller needles simply cannot replicate. We are chasing that perfect, meditative hum where the clicking of the tips becomes the metronome for your creative output.
The physics of a size 9 needle, which measures exactly 5.5 millimeters in diameter, creates a fabric density that is substantial yet breathable. If you have ever felt a garment that was too stiff, it was likely because the needle diameter was too small for the yarn's ply. We are aiming for a drape that follows the contours of the head without losing its shape over time. This is about more than just aesthetics; it is about the tensile strength of the finished loops and how they distribute the weight of the wool. Grab your favorite worsted weight skein, and let us dive into the technical beauty of the seamless crown.
THE STUDIO KIT
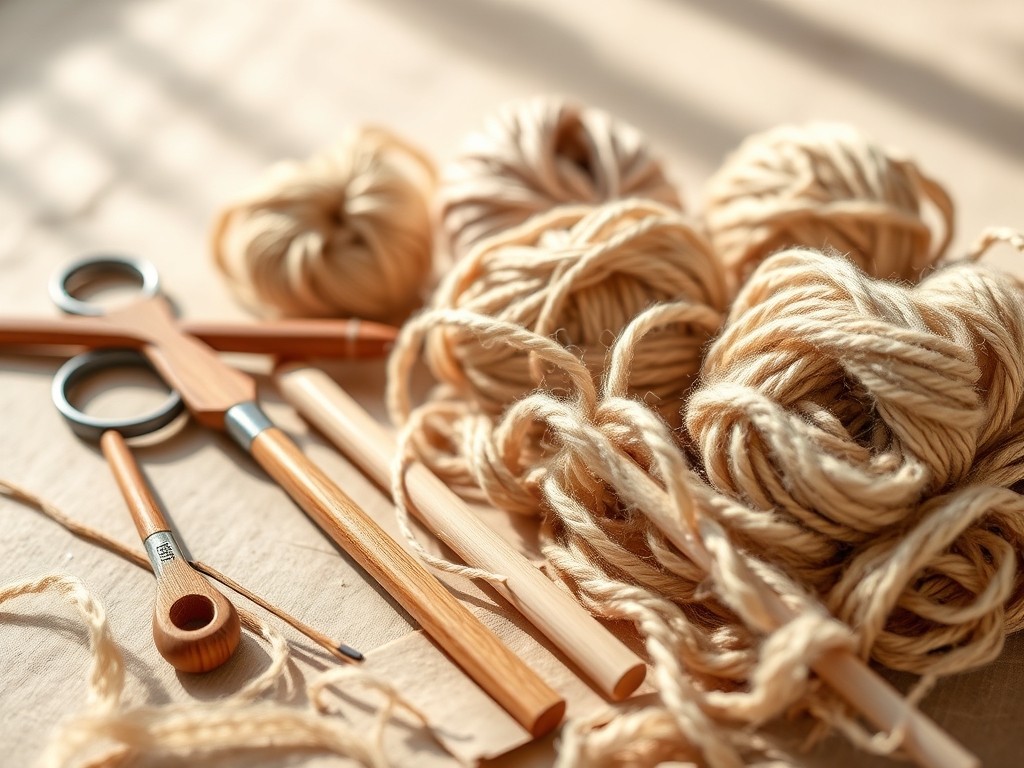
To achieve professional results, your studio kit needs to be curated for efficiency and precision. We start with the size 9 circular needles, preferably with a 16 inch cable. The cable material is vital; look for a flexible, memory free nylon or a steel core coated in smooth plastic. This ensures that as you rotate the work, the cable does not kink or resist your movement. You will also need a set of digital calipers to verify your needle diameter, as manufacturing tolerances can vary slightly between brands.
For the textile, a high twist worsted weight yarn is essential. The high twist increases the tensile strength and prevents pilling, which is crucial for a hat that will face the elements. You should also have a rotary cutter and a self healing mat on your bench for trimming yarn ends with surgical precision. For finishing the crown, keep a bent tip tapestry needle nearby; the ergonomic angle allows you to weave in ends without distorting the surrounding stitch architecture.
Material Substitutions: If you cannot find a 16 inch cable, you can utilize the Magic Loop method with a 32 inch or 40 inch cable. This requires a needle with a highly flexible join to prevent stress fractures in the cable. If wool is too abrasive for your skin, substitute with a pima cotton and acrylic blend. Note that cotton has zero elasticity, so your Rhythmic Knitting Motion will need to be more deliberate to maintain a consistent gauge.
THE TEMPO
The creation of a seamless hat is a three phase operation that relies on the Maker's Rhythm. Phase one is the Foundation Phase, which includes the cast on and the initial ribbing. This takes approximately 45 minutes. During this time, your focus is on setting the circumferential tension. If the cast on is too tight, the hat will lack the necessary expansion to fit the human cranium comfortably.
Phase two is the Body Phase, the heart of the project. This spans two to three hours of continuous work. This is where the Rhythmic Knitting Motion becomes subconscious. You are building the vertical walls of the hat, and your speed will naturally increase as the muscle memory takes over. Finally, phase three is the Crown Deceleration, taking about 30 minutes. As you decrease the number of stitches, the diameter of the work shrinks, requiring you to switch to double pointed needles or the magic loop technique. Total active production time is roughly four hours, making this the perfect "afternoon in the studio" project.
THE CORE METHOD
1. The Long Tail Foundation
Start by measuring a tail three times the circumference of the finished hat. Use a long tail cast on to provide a stretchy, durable edge. This technique incorporates a row of knitting into the cast on itself, which increases the structural integrity of the brim.
Mastery Tip: Keep your thumb and index finger at a consistent angle. The friction coefficient of the yarn against your skin dictates the tightness of the loop. If you pull too hard, you compress the fibers and lose the "bounce" required for a comfortable fit.
2. Establishing the Ribbed Architecture
Work in a knit two, purl two pattern for at least two inches. This creates a bellows effect, allowing the fabric to expand and contract. The ribbing acts like a mechanical spring, ensuring the hat stays anchored during movement.
Mastery Tip: Use a stitch marker to denote the beginning of the round. This prevents "jogging," a common technical error where the start and end of a round do not align perfectly, creating a visible seam in a seamless garment.
3. The Stockinette Flow
Transition into full knit stitches. This is where the Rhythmic Knitting Motion reaches its peak efficiency. Your goal is a consistent gauge of 4 stitches per inch. Use a knitting gauge tool every few inches to verify that your tension has not drifted as you relax into the rhythm.
Mastery Tip: Observe the grain direction of the stitches. They should look like perfect "Vs." If they appear twisted, you are likely wrapping your yarn in the wrong direction, which increases the torque of the fabric and causes the hat to slant.
4. Crown Reduction Physics
Begin decreasing stitches at four or six equidistant points around the circle. This creates a geodesic dome shape. By reducing the number of active loops, you are essentially folding the fabric inward on itself to close the top of the cylinder.
Mastery Tip: As the stitch count drops, the lateral tension on the needles increases. Switch to double pointed needles before the tension becomes so high that it risks snapping the yarn or bending the needle tips.
THE TECHNICAL LEDGER
Maintenance & Longevity: To keep your size 9 needles in peak condition, wipe them down with a microfiber cloth after every session. Skin oils can be acidic and may tarnish metal needles or degrade the finish on wooden ones. Store your circular needles in a hanging organizer rather than coiled in a drawer to prevent the nylon cables from developing a permanent "set" or memory.
Material Variations:
- Sustainable: Use organic hemp and wool blends for a carbon neutral footprint.
- Recycled: Look for yarns made from reclaimed sari silk or recycled plastic bottles.
- Premium: Cashmere and silk blends offer the highest tactile luxury and superior thermal regulation.
The Correction:
- The Gap: If you see a hole at the join of the first round, use the yarn tail to "sew" the gap closed using a duplicate stitch technique.
- The Ladder: If you see loose vertical strands between needles, pull the first two stitches of every new needle tighter to compensate for the mechanical slack.
- The Flare: If the brim is wider than the body, you likely switched your tension. Block the hat over a head form to redistribute the fiber density.
Studio Organization: Store your active project in a breathable cotton bag. Avoid plastic bins for long term storage, as they can trap moisture and lead to mildew. Keep a small awl in your travel kit to help pick up dropped stitches without distorting the surrounding ply.
THE FINAL REVEAL
There is nothing quite like the moment you pull your finished hat off the needles and realize you have created a three dimensional object from a single strand of fiber. The Rhythmic Knitting Motion has resulted in a garment that is both a feat of engineering and a cozy masterpiece. The size 9 needles have created a fabric that is thick enough to ward off a winter chill but light enough to feel like a second skin. Run your hands over the surface; the stitches should be uniform, the crown should be perfectly centered, and the drape should be flawless. You did not just knit a hat; you mastered the physics of the loop.
STUDIO QUESTIONS
Why use size 9 needles for hats?
Size 9 needles provide the ideal gauge for worsted weight yarn. This diameter creates a balanced fabric that offers both warmth and flexibility, ensuring the hat maintains its structural integrity over many seasons of wear.
How do I stop my circular cable from curling?
Dip the nylon cable into hot water for thirty seconds, then pull it straight. This resets the molecular memory of the plastic, allowing for a smoother Rhythmic Knitting Motion without the frustration of constant kinking or twisting.
What is the best way to join a new ball of yarn?
Use the Russian Join for a seamless transition. By threading the yarn back into itself with a tapestry needle, you create a continuous strand that maintains the tensile strength of the yarn without the bulk of a knot.
How do I know if my tension is too tight?
If your hands ache or the stitches are difficult to slide along the needle, your lateral tension is too high. Relax your grip and focus on the Rhythmic Knitting Motion to allow the yarn to flow naturally.

