
The snap of the thread is a sound you feel in your marrow before you hear it with your ears. When you are working with high grade Egyptian cotton, the tensile strength is surprisingly high; yet, if your tension is uneven, the fiber will protest with a sharp, brittle pop. We are diving into the world of Rhythmic Tatting Lace, a craft that is essentially the physics of knots masquerading as delicate art. It is all about the transfer of the loop. If you do not master the "flip" of the stitch, you are just tying knots around a core; but when you find the flow, the shuttle becomes an extension of your own hand. You are not just making a bookmark; you are engineering a structural lattice that relies on friction and torque to hold its shape for a century. Grab your favorite shuttle and let us get into the grit of the grain.
THE STUDIO KIT
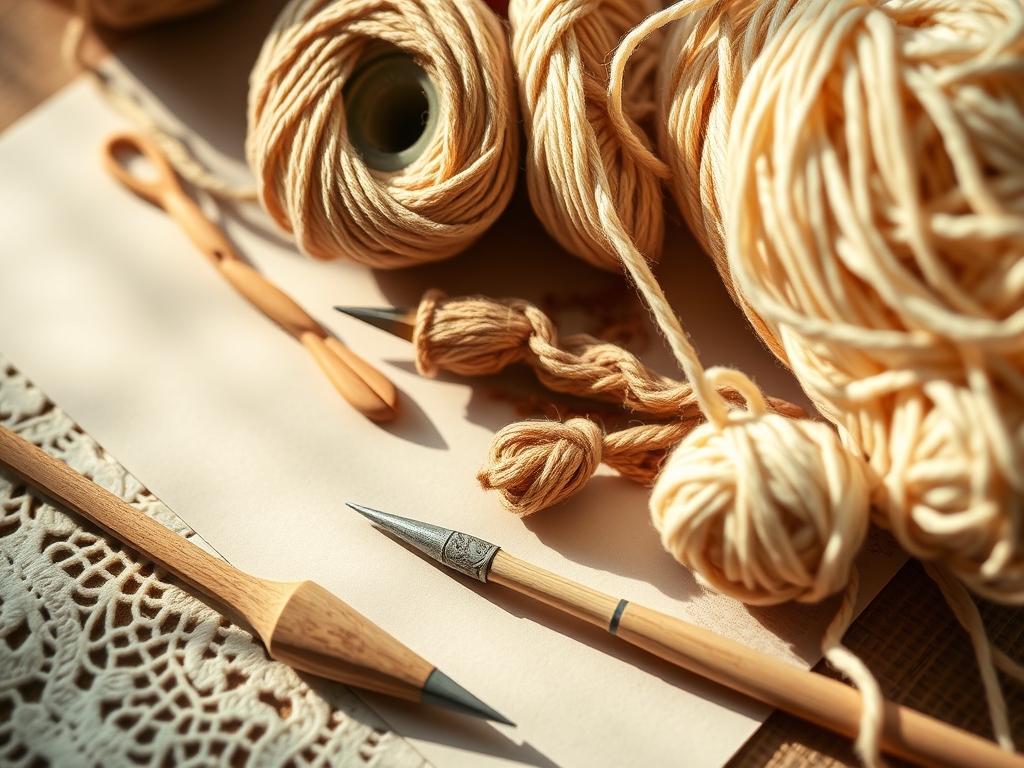
To master Rhythmic Tatting Lace, you need more than just string. You need precision instruments. First, the shuttle itself must be ergonomic; I prefer a post-style shuttle with a removable bobbin because it allows for rapid thread changes without sacrificing the aerodynamic balance of the tool. Your thread should be a size 20 or 40 mercerized cotton. The mercerization process involves treating the cotton with sodium hydroxide to swell the fibers, which increases luster and, more importantly, improves the tensile strength and dye affinity.
You will also need a fine steel crochet hook (size 12 or 14) for joining picots, though many modern shuttles feature an integrated hook or "pointy bit" for this exact purpose. Keep a pair of precision embroidery scissors nearby; the blades must be sharp enough to shear the fiber without fraying the ply. For material substitutions, if you cannot find mercerized cotton, you can use a high quality silk thread for a luxurious sheen, though be warned that silk has a lower friction coefficient and may slip during the knot transfer. Avoid standard sewing thread; it lacks the necessary twist density to maintain the structural integrity of a free standing lace project.
THE TEMPO
The "Maker's Rhythm" is not just a poetic concept; it is a measurable state of peak cognitive flow. For a standard six inch bookmark, expect a total production time of four to six hours depending on the complexity of your picot clusters. The first thirty minutes are the "Calibration Phase," where you find the specific gauge of your tension for that day. Moisture in the air or the natural oils on your skin can affect the drag of the thread.
Once you hit the "Flow State" (usually around the second motif), your speed will increase. This is where the rhythmic element kicks in. You are looking for a consistent beat: "over, under, flip, slide." If you break this tempo, your stitches will vary in density, leading to a warped final product. The final hour is dedicated to "Finishing," which involves weaving in ends with a needle and a light steam block to set the fibers.
THE CORE METHOD
1. The Foundation Loop and Grip
Start by winding your shuttle. Ensure the thread is wound evenly to prevent the bobbin from wobbling, which can cause uneven torque. Hold the shuttle in your dominant hand and create a circle of thread around your non-dominant hand. This circle is your working space.
Mastery Tip: The science here is all about surface tension. By keeping the thread taut across your middle and ring fingers, you create a stable platform that allows the shuttle to pass through without snagging the microscopic "fuzz" of the cotton fibers.
2. The First Half of the Double Stitch
Slide the shuttle under the thread on your hand, then bring it back over. This is the "under-over" motion. As you pull the shuttle back, you must relax the tension on your hand thread to allow the knot to "flip" onto the shuttle thread.
Mastery Tip: This is a lesson in kinetic energy transfer. If the knot does not flip, you are essentially tying the shuttle thread to the hand thread, which will lock the ring. The flip ensures the hand thread remains the core, allowing the ring to close smoothly.
3. The Second Half of the Double Stitch
Now, go over the hand thread and then under. This completes the "Double Stitch," the fundamental unit of Rhythmic Tatting Lace. Again, ensure the flip occurs. The two halves should sit snugly against each other like microscopic vertebrae.
Mastery Tip: The structural integrity of the lace depends on the uniformity of these stitches. If one half is tighter than the other, the lace will spiral. Use your fingernail to "burnish" or push the stitches together for a dense, professional finish.
4. Engineering the Picot
A picot is simply a gap left between two double stitches. When you slide the second stitch toward the first, the excess thread loops upward. This is not just decorative; it is a functional join point for future rounds.
Mastery Tip: To keep picots consistent, use a caliper or a plastic gauge. Inconsistent picot size creates uneven stress distribution across the lace, which can lead to tearing under high tension.
5. Closing the Ring
Once you have completed your required number of stitches and picots, hold the stitches firmly between your thumb and forefinger. Pull the shuttle thread steadily until the circle collapses into a tight ring.
Mastery Tip: Watch out for friction heat. If you pull too fast, the thread can actually singe or weaken. A slow, steady pull allows the fibers to settle into their new geometry without compromising the tensile strength.
6. The Chain Transition
To move between rings, you will work off the ball thread. This creates a linear "chain" rather than a closed loop. The stitches are the same, but the geometry changes from circular to architectural.
Mastery Tip: Chains provide the lateral stability for your bookmark. Because they do not close on themselves, they are more susceptible to stretching. Keep your tension slightly tighter on chains to compensate for this lack of internal bracing.
7. Joining Motifs
Use your crochet hook to pull the hand thread through a picot on a previous ring. Pass the shuttle through the resulting loop and tighten. This creates a seamless bridge between elements.
Mastery Tip: This is a mechanical interlock. The join must be tight enough to prevent "play" in the lace. If the join is loose, the bookmark will feel floppy rather than crisp.
8. Reversing the Work
Often, you will need to flip the entire piece of lace over to start the next element. This is called "RW" or Reversing Work. It changes the direction of the knots to create mirrored symmetry.
Mastery Tip: Reversing the work manages the grain direction of the lace. Just like wood, lace has a direction in which it prefers to bend. Reversing the work ensures that the finished piece lies flat on a table rather than curling into a tube.
9. The Final Tie and Hide
When the pattern is complete, tie a square knot. Use a fine needle to "bury" the tails inside the last few double stitches. This hides the ends and uses the friction of the existing stitches to lock the tails in place.
Mastery Tip: Use a tiny drop of fray check or clear fabric glue if you are using a synthetic blend. For pure cotton, the capillary action of the fibers will usually hold a buried tail securely without the need for adhesives.
THE TECHNICAL LEDGER
Maintenance & Longevity:
To keep your Rhythmic Tatting Lace pristine, hand wash in cool water with a pH-neutral detergent. Avoid twisting; instead, press the lace between two white towels to remove moisture. Pin it out on a blocking board using stainless steel pins to prevent rust spots.
Material Variations:
- Sustainable: Use organic hemp thread for a rustic, high-durability finish.
- Recycled: Unraveled high-quality vintage linens can provide a unique, "broken-in" feel.
- Premium: 100% long-staple Giza cotton offers the smoothest "flip" and highest luster.
The Correction:
- The Locked Ring: If the ring won't close, you missed the "flip." Use an awl to gently pick apart the stitches and restart.
- The Twisted Chain: This happens when you rotate the shuttle during the pass. Keep the shuttle flat to maintain a consistent ply twist.
- The Gap: If there is a space between the ring and the chain, your "set" is too loose. Ensure the first stitch of a new element is snug against the previous one.
Studio Organization:
Store your lace flat in acid-free tissue paper. If you are storing it in a drawer, keep it away from cedar or oak, as the tannins in the wood can yellow the cotton fibers over time.
THE FINAL REVEAL
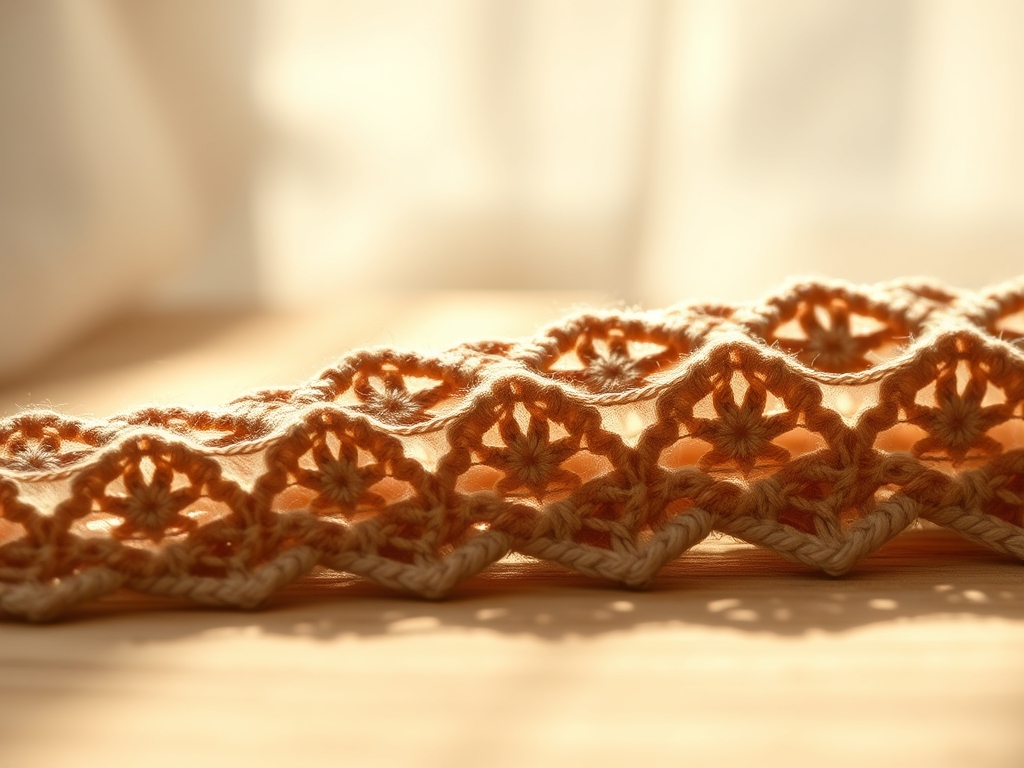
Look at that! You have successfully navigated the complex world of Rhythmic Tatting Lace. The finished bookmark should feel firm, almost like a thin sheet of plastic, thanks to the dense interlocking of the double stitches. When you hold it up to the light, the picots should be perfectly symmetrical, creating a delicate halo around the core structure. This is not just a craft; it is a testament to your patience and your mastery of fiber physics. Your books are officially going to be the most stylish ones in the library.
STUDIO QUESTIONS
How do I prevent my thread from kinking?
Hold the shuttle and let it hang freely to untwist every few inches. This releases the built up torque in the thread, preventing "birds nests" and ensuring a smooth, consistent stitch flow throughout your project.
What is the best thread for beginners?
Start with a size 10 mercerized cotton. The larger gauge makes it easier to see the "flip" of the stitch. Once your muscle memory is locked in, you can graduate to finer, more traditional lace weights like size 80.
Can I use a sewing needle instead of a shuttle?
Yes, that is called "Needle Tatting." It uses a long, blunt needle to hold the stitches. While it is easier to learn, it produces a slightly thicker, less dense lace compared to the rhythmic shuttle method.
How do I fix a broken thread mid-project?
Use a weaver's knot to join the new thread, then hide the tails inside the next few double stitches. This maintains the tensile strength of the piece without creating a bulky, unsightly lump in your delicate lace.

