
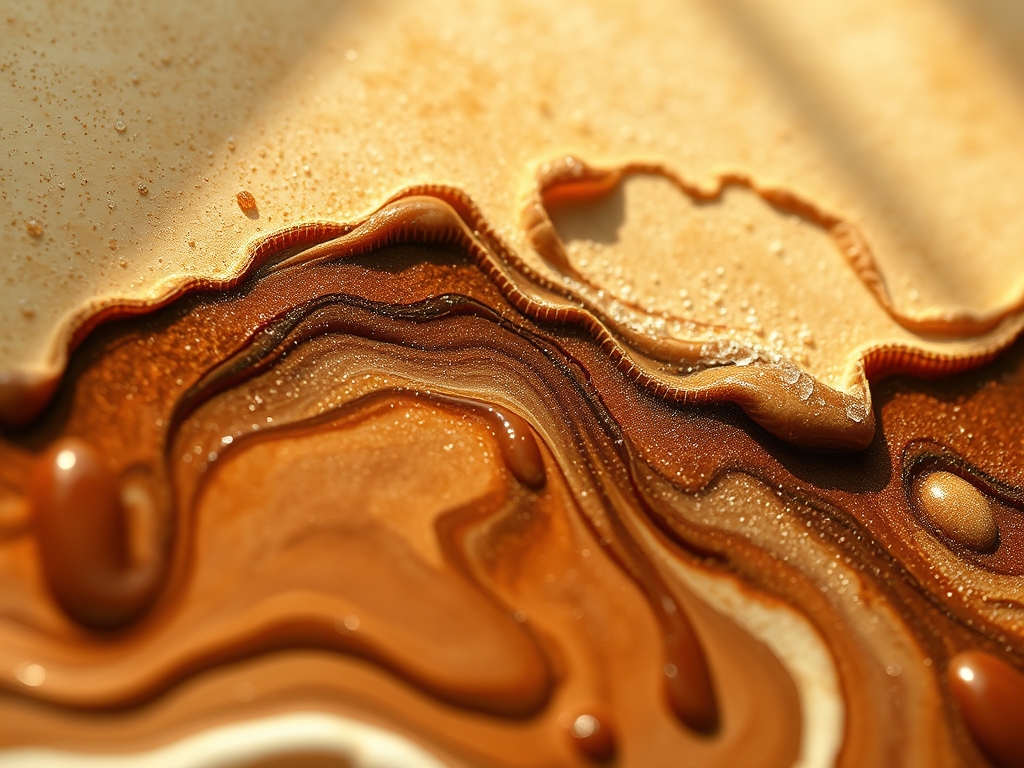
Imagine the scent of cold-pressed linseed oil hitting the air as you uncapsulate a fresh tube of lead-white alternative. It is thick, buttery, and holds its shape with a high viscosity that feels almost stubborn against the palette knife. But then, you introduce the solvent. You watch the pigment break down, losing its rigid structure to become a sleek, moving tide. Mastering Fluid Oil Painting is not just about thinning your colors; it is about managing the molecular tension between the binder and the substrate. When you are aiming for realistic skin, you are essentially building a translucent filter that mimics human biology. You are layering light. The tactile sensation of a soft squirrel-hair brush gliding over a sanded gesso surface is addictive. It feels like silk on glass. We are going to dive deep into the physics of the "fat over lean" rule to ensure your portraits do not just look like people, but feel like living, breathing entities. Grab your apron, because we are about to turn chemistry into fine art.
THE STUDIO KIT
To achieve that hyper-realistic, glowing skin tone, your kit needs to be as precise as a surgeon's tray. You will need a range of synthetic mongoose brushes for their snap and ability to hold fluid without splaying. For the base, a non-porous aluminum composite panel or a high-thread-count linen canvas is essential. If the surface is too toothy, the fluid medium will settle into the valleys of the weave, ruining your smooth gradients. You also need a mahl stick to stabilize your hand without touching the wet surface.
Your chemistry set includes refined linseed oil, odorless mineral spirits, and a stand oil for long-chain polymer strength. For the pigments, prioritize transparent earth tones like Raw Sienna and Transparent Oxide Red. These allow light to pass through the paint layers and bounce off the white primer, creating the optical scattering effect found in real dermis.
Material Substitutions: If you cannot find stand oil, a high-quality walnut oil works beautifully as a slower-drying alternative with less yellowing. Instead of a traditional palette, use a glass sheet backed with gray paper; this allows you to see the chromatic value of your fluid mixes without the interference of a wood grain background.
THE TEMPO
The "Maker's Rhythm" in fluid oil painting is a marathon, not a sprint. You are working with oxidative drying times, which means the clock is dictated by the atmosphere.
- The Underpainting (2 hours): A quick, lean wash to establish values.
- The First Pass (4 to 6 hours): Blocking in mid-tones and shadows while the surface is "open."
- Curing Phase (3 to 5 days): You must wait for the layers to undergo polymerization before adding more oil.
- The Glazing Cycle (1 hour per layer): Multiple sessions of ultra-thin, fluid applications.
Total project time usually spans three weeks. You are not just painting; you are waiting for chemical bonds to stabilize so the next layer does not melt the one beneath it.
THE CORE METHOD
1. Establishing the Lean Underpainting
Start with a wash of pigment heavily diluted with odorless mineral spirits. This layer must be "lean," meaning it has a high solvent-to-oil ratio. This ensures the paint sinks into the priming pores and dries quickly, providing a stable foundation for the heavier layers to come.
Mastery Tip: This step utilizes capillary action. The solvent pulls the pigment deep into the substrate's surface texture. If this layer is too oily, subsequent layers will slide off or crack as they dry at different rates.
2. Mapping the Subsurface Scattering
Real skin is not one color; it is a map of veins, fat, and muscle. Apply a fluid layer of cool blues and greens in the shadow areas and warm ochres in the fleshy parts. Keep the paint translucent so the white of the canvas acts as your primary light source.
Mastery Tip: Human skin exhibits subsurface scattering, where light enters the skin, bounces around, and exits at a different point. By keeping your fluid layers thin, you allow the physics of light refraction to do the heavy lifting for you.
3. The Soft Edge Blending
Using a dry, fluffy mop brush, gently "tickle" the edges where two colors meet. Because your paint is in a fluid state, the surface tension is low, allowing the pigments to migrate and mingle without creating harsh ridges or visible brushstrokes.
Mastery Tip: Use a caliper to check the proportions of the features during this stage. Even the most beautiful skin texture cannot save a portrait with incorrect cranial geometry.
4. Building the Fat Glazes
As you move toward the final details, increase the amount of stand oil in your mix. This makes the paint "fat." These layers are incredibly fluid and glossy, acting like a lens over the previous dry layers. This is where the "glow" happens.
Mastery Tip: The tensile strength of the paint film increases with more oil. A fat layer over a lean layer prevents "delamination," which is when the paint literally peels off the canvas because the top dried faster than the bottom.
5. Highlighting with Impasto Accents
For the final "wet" look on eyes or sweat, use a tiny amount of paint with very little medium. This creates a physical 3D bump on the surface that catches the actual studio light.
Mastery Tip: This creates a specular highlight. While the rest of the painting relies on internal light reflection, these thick bits use external physics to create the illusion of moisture.
THE TECHNICAL LEDGER
Maintenance & Longevity: Once the painting is touch-dry (usually 2 to 4 weeks), keep it in a dust-free environment. Do not varnish for at least six months. The oil needs to breathe to complete its oxidative curing process. If you seal it too early, the paint will remain mushy underneath the varnish forever.
Material Variations:
- Sustainable: Use bio-based solvents derived from citrus or soy.
- Premium: Incorporate genuine Lapis Lazuli or Cadmium for unmatched lightfastness.
- Recycled: Old glass jars make perfect airtight containers for custom fluid mediums.
The Correction:
- The Muddy Mess: If colors are mixing into gray, your bottom layer is too wet. Use a palette knife to scrape it back to the canvas and start over.
- The Bead-Up: If the paint beads up like water on a car, the surface is too oily. Wipe it with a tiny bit of solvent to "break" the surface tension.
- The Crackle: If the top layer cracks, you ignored the "fat over lean" rule. Sand it down lightly with fine-grit sandpaper and re-apply a fattier glaze.
Studio Organization: Store your fluid oil paintings vertically in a drying rack. Ensure the room has consistent airflow and indirect UV light, which helps the oil cross-link without yellowing the pigments.
THE FINAL REVEAL
Look at that glow! When you master Fluid Oil Painting, the result is a portrait that looks like it has a pulse. The skin should look soft, with transitions so smooth they defy the human eye. By respecting the chemistry of your mediums and the physics of light, you have created something that is not just a picture, but a technical masterpiece of depth and luminosity.
STUDIO QUESTIONS
How do I make my oil paint more fluid?
Mix your pigment with a medium composed of one part linseed oil and two parts odorless mineral spirits. This reduces the viscosity while maintaining enough binder to keep the pigment particles suspended and adhered to your canvas.
Why is my fluid oil painting cracking?
Cracking usually occurs when you apply a "lean" layer (more solvent) over a "fat" layer (more oil). The lean layer dries faster and loses its flexibility, causing it to shatter as the oily layer beneath it shifts and shrinks.
Can I use water-based oils for this?
Yes, but the evaporation rate is different. Water-mixable oils rely on an emulsifier. You must use the specific water-compatible mediums to maintain the structural integrity of the paint film during the fluid blending process.
What is the best brush for blending skin?
A soft goat hair or synthetic squirrel mop brush is best. These fibers have a high capillary capacity, meaning they can move fluid paint without leaving the "tracks" or deep grooves that stiff hog bristles would leave behind.

