The scent of heavy cotton rag paper hits you first; it is earthy, slightly sweet, and thick with the promise of structural integrity. You can feel the tooth of the surface beneath your fingertips, a microscopic landscape of interlaced fibers waiting to catch the pigment. We are diving into the meditative physics of Intricate Mandala Drawing today, and it is going to be glorious. This is not just doodling. This is a high stakes dance of geometry and friction where the tensile strength of your paper meets the hydraulic flow of archival ink. When you press your metal compass into the center point, there is a satisfying resistance as the needle seats itself into the grain. We are building a universe from a single point of origin, using symmetry as our skeletal framework. Grab your finest technical pens and clear your workspace; we are about to transform a blank, porous substrate into a masterpiece of mathematical precision and artistic soul.
THE STUDIO KIT
To master the art of Intricate Mandala Drawing, your kit must prioritize precision instruments that minimize mechanical play. Start with a high quality stainless steel drafting compass featuring a gear head; this ensures your radius remains locked despite the lateral pressure of your hand. You will need a range of technical fineliners (sizes 0.03 to 0.8) containing pigmented archival ink that resists capillary action, preventing the dreaded feathering on the paper fibers.
The paper itself should be at least 250 gsm with a smooth vellum finish to reduce drag. For measurements, a transparent protractor and a precision machinist ruler are essential for establishing your radial guides. If you are working on a budget, you can use a sturdy piece of cardboard as a backing to protect your desk from the compass needle. For material substitutions, try using a high gauge sewing needle and a length of non stretch nylon thread as a makeshift trammel if a professional compass is unavailable. Instead of specialized drafting paper, a heavy weight mixed media pad will suffice, provided you burnish the surface with a bone folder first to flatten the fibers for smoother ink delivery.
THE TEMPO
The rhythm of Intricate Mandala Drawing is a lesson in patience and mechanical consistency. Expect to spend approximately twenty minutes on the Geometric Foundation, where you map out your concentric circles and degree markers. This is the "Maker's Rhythm," a phase characterized by steady, repetitive movements that prime your brain for deep focus. The Primary Structural Phase takes about two hours; this is where the large shapes and heavy lines define the skeleton of the piece.
Finally, the Detailing and Micro-Patterning can span anywhere from five to fifteen hours depending on the density of your work. During this stage, your heart rate slows and your breathing syncs with the stroke of the pen. It is a marathon of micro-movements where the friction of the nib against the paper becomes a tactile metronome. Do not rush the ink drying time; pigmented inks require at least sixty seconds to fully bond with the cellulose fibers before you can safely erase your pencil guides without risking a smudge.
THE CORE METHOD
1. The Zero Point and Radial Grid
Begin by locating the exact center of your substrate using your machinist ruler to find the intersection of the diagonals. Use your compass to draw a series of concentric circles at varying intervals; these are your "latitudes." Next, use your protractor to mark every fifteen or thirty degrees around the circumference. Connect these marks through the center point to create your "longitudes."
Mastery Tip: This step relies on structural integrity. By creating a dense grid, you provide a roadmap that prevents "drift." Even a half millimeter deviation at the center will result in a massive asymmetry at the outer edge due to the law of angular displacement.
2. Establishing the Primary Motifs
Using a medium gauge pen, such as a 0.5 fineliner, begin drawing your largest shapes within the grid segments. Focus on maintaining a consistent tensile pressure on the pen; too much force will gouge the paper, while too little will result in a broken ink line. Mirror each shape across the radial axis immediately to ensure symmetry.
Mastery Tip: Understand surface tension. When you lay down a thick line of ink, it sits on top of the paper fibers for a split second before being absorbed. Moving too fast can cause the ink to "bead" rather than flow, leading to uneven line weights.
3. Layering the Secondary Patterns
Once the skeleton is set, move to a 0.1 or 0.2 nib. Fill the negative space within your primary motifs with smaller geometric or organic shapes. This is where the Intricate Mandala Drawing begins to gain its hypnotic quality. Work in a clockwise direction to avoid dragging your hand through fresh ink.
Mastery Tip: Use the concept of geometric tessellation. By repeating small, identical units, you create a visual texture that mimics the molecular structure of crystals. This repetition reinforces the paper's surface as the ink binds with the top layer of ply.
4. The Micro-Detailing and Stippling
Switch to your finest 0.03 nib for the final layer of detail. Add tiny dots, thin hairlines, or internal shading. This phase adds depth and a sense of "shimmer" to the mandala. The goal is to maximize the visual density without overwhelming the white space of the paper.
Mastery Tip: This step utilizes capillary action. The fine nib relies on the paper's thirst to pull the ink out of the reservoir. If the nib feels scratchy, your angle is likely too steep; maintain a 70 degree angle for optimal fluid dynamics.
5. Contrast and Weight Balancing
Review the entire composition and identify areas that need more visual "weight." Use a brush pen or a 0.8 fineliner to thicken specific lines or fill in solid black sections. This creates a hierarchy of shapes that guides the viewer's eye from the center outward.
Mastery Tip: Pay attention to pigment load. Large areas of solid black can cause the paper to warp slightly as the moisture from the ink expands the fibers. Work in small sections to allow the paper to dissipate the moisture evenly.
6. The Clean Up and Burnish
After the ink has cured for at least thirty minutes, use a soft polymer eraser to remove the pencil guides. Erase in a radial motion, moving from the center out to avoid wrinkling the edges. Finally, place a clean sheet of paper over the mandala and rub it gently with a bone folder to flatten any raised ink lines.
Mastery Tip: This is the burnishing phase. It compresses the fibers back down, locking the pigment into the paper and giving the finished piece a professional, printed look. It also removes any residual graphite that might dull the vibrancy of the ink.
THE TECHNICAL LEDGER
Maintenance & Longevity: To keep your Intricate Mandala Drawing pristine, avoid touching the inked surface with bare skin; natural oils can degrade the archival quality over time. Store your finished work in an acid free, pH neutral sleeve. If you use a compass with a lead attachment, keep the lead sharpened to a "chisel point" using a sandpaper block for maximum accuracy.
Material Variations: For a sustainable approach, use hemp or bamboo paper, which offers high tensile strength and a unique, porous texture. Premium options include vellum made from calfskin, though this requires specialized inks that can bond with a non porous surface. For a modern twist, use metallic leaf and an adhesive size to add reflective elements to your radial guides.
The Correction:
- The Smudge: If you smear wet ink, let it dry completely. Use a sharp X-Acto blade to gently scrape the top layer of paper fibers away, then burnish the area smooth.
- The Asymmetry: If a shape is off center, do not try to erase it. Instead, add a "compensating detail" to the surrounding shapes to balance the visual weight.
- The Ink Clog: If your technical pen stops flowing, tap it vertically on a hard surface or wipe the nib with a damp, lint free cloth to break the surface tension of the dried ink.
Studio Organization: Store your compass and pens horizontally to prevent ink from settling in the nib or the pivot joints from becoming loose. Keep your paper flat in a "plan chest" or a rigid portfolio to prevent curling, which can interfere with the accuracy of your compass measurements.
THE FINAL REVEAL
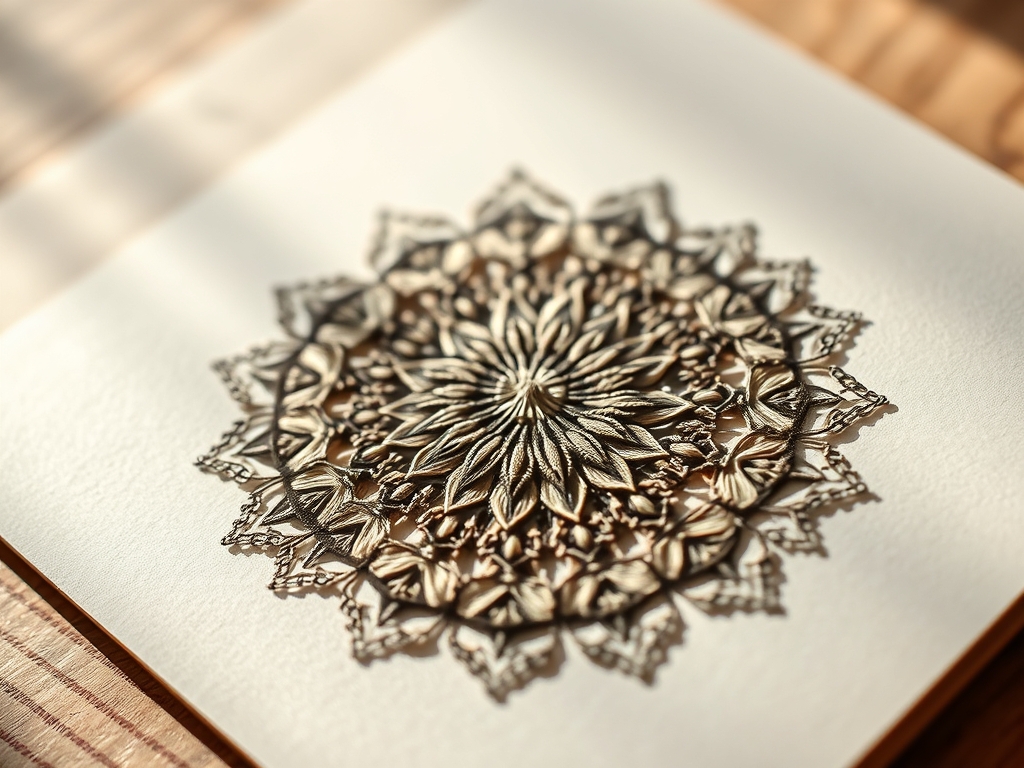
Look at that! Your finished Intricate Mandala Drawing is a testament to the intersection of art and engineering. The way the lines converge at the center creates a sense of infinite depth, while the outer rings provide a grounding, structural boundary. The contrast between the crisp, black ink and the tactile, ivory paper is nothing short of professional grade. You have successfully navigated the physics of fluid dynamics and the geometry of the circle. This piece is ready for a gallery frame or a prominent spot on your studio wall where the light can catch the subtle texture of the burnished ink.
STUDIO QUESTIONS
What is the best paper for mandala drawing?
High gsm cotton rag paper with a smooth vellum finish is ideal. It provides the necessary tensile strength to withstand compass needles and the porosity to absorb archival ink without feathering or bleeding through the back.
How do I prevent my compass from slipping?
Ensure the needle is sharp and use a self healing cutting mat or a piece of heavy cardboard underneath your paper. This allows the needle to seat deeply into a stable substrate, preventing lateral movement during rotation.
Can I use regular ballpoint pens?
Ballpoint pens are not recommended for intricate work because the oil based ink can "glob" and smear. Technical fineliners use water based pigmented ink that flows consistently and dries quickly, ensuring clean, precise lines.
How do I fix a mistake in ink?
Wait for the ink to dry, then use a fine grit sandpaper or a precision craft blade to carefully lift the top layer of fibers. Burnish the spot with a bone folder afterward to restore the paper's smooth texture.
How long should I wait before erasing pencil lines?
Wait at least thirty minutes to ensure the ink has fully bonded with the paper fibers. Erasing too early can cause "ghosting" or smearing, as the moisture in the ink may still be present in the lower plys.